How do I setup a Predictive Campaign?
Creating a Campaign: (Only available on ADMIN Accounts)
1. Login to your PD server
2. Go to CAMPAIGN TAB. ![]()
3. Click on CREATE NEW CAMPAIGN button. 
If you are building a campaign from an existing campaign click the load button first, if not then just proceed with 4-15.
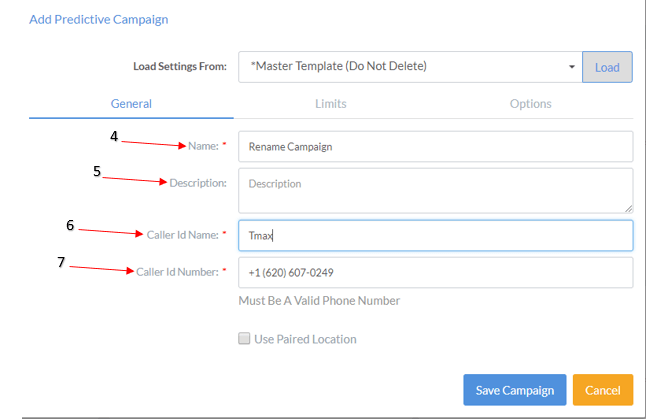
4. Name campaign. (See Pictures Below for 4-15)
5. Put a brief description in. (Optional)
6. Put the name of your company in the caller ID.
7. Put your phone number into Caller ID number field.
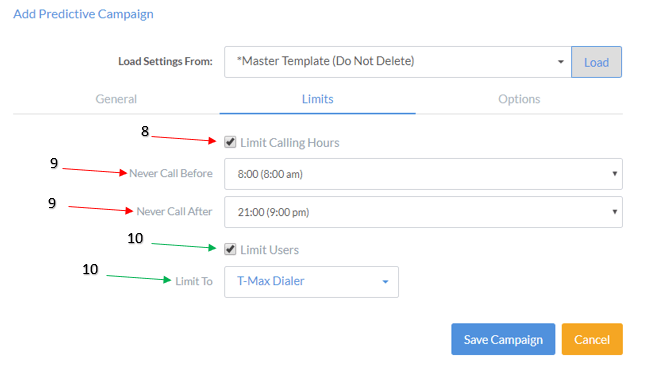
8. Check the limit callings hours box.
9. Put what time you wish to never call before and never call after (Based on area code of person being called).
10. If you want to limit the campaign to a single user you can check the Limit Users box and select who you want to limit it to.
11. Dial Rate Override is the speed of the dialer and should generally be set to 3. You may speed up to 5 or slow down to 1 based upon your company’s needs. We also have an auto setting that will watch how many calls are being dropped and answered and will adjust accordingly. The inbound dial rate setting is used during an inbound blend. Please call for details regarding our inbound blend features.
12. Wait for Agent is how long the person called will be put on hold, if all your agents are busy, 60 seconds is Maximum.
13. AMD is our Answering Machine Detection system. Please Check this Box if you would like to bypass answering machines. The system is designed to give you live contacts. Checking this box will allow 75% or more of answering machines to be dropped so your agents can focus on live party contacts, not voice-mails.
14. Record all will record all calls. (They will be stored for up to 2-weeks or until your delete the campaign, WHICH EVER COMES FIRST)
15. Click to Save Campaign.

16. Click on little speaker ![]() on you campaign box to Add or Update Message (This is for the abandon message, this is played when a caller is put on hold because agents are busy. The message should tell the consumer to hold for next available agent). (See Pictures Below for 16-20)
on you campaign box to Add or Update Message (This is for the abandon message, this is played when a caller is put on hold because agents are busy. The message should tell the consumer to hold for next available agent). (See Pictures Below for 16-20)
17. Click Add a Sound File then name the sound file for your abandon message.
18. Record your message over the phone or upload a sound file from your computer then click Add Sound. (must be in .wav format)
19. Next set sound file as abandon Message.
20. Then click the COPY SOUND FILES to Campaign.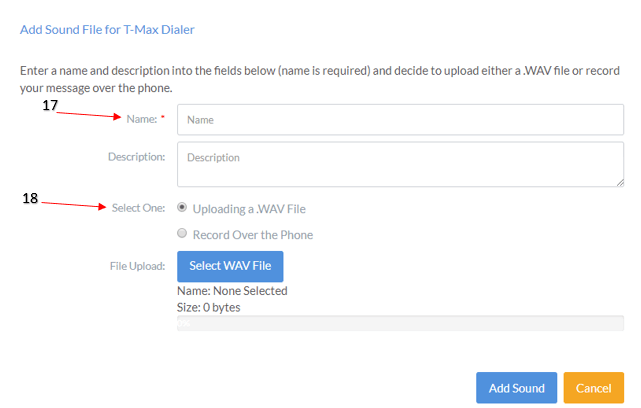

21. Click on the upload contacts icon, the PLUS button. ![]() (See Pictures Below for 21-24)
(See Pictures Below for 21-24)
22. Then click Load CSV File, locate your csv file and click to open.
23. Next click the AUTO ASSIGN button and it will match up your .csv file columns with your database fields, the ones that do not match will need to be assigned from the drop down manually to the correct column header.
24. Place the *Phone* in the phone column, if more than one column of phone numbers appears, drag and drop Phone2, Phone3, and so on into each phone number column.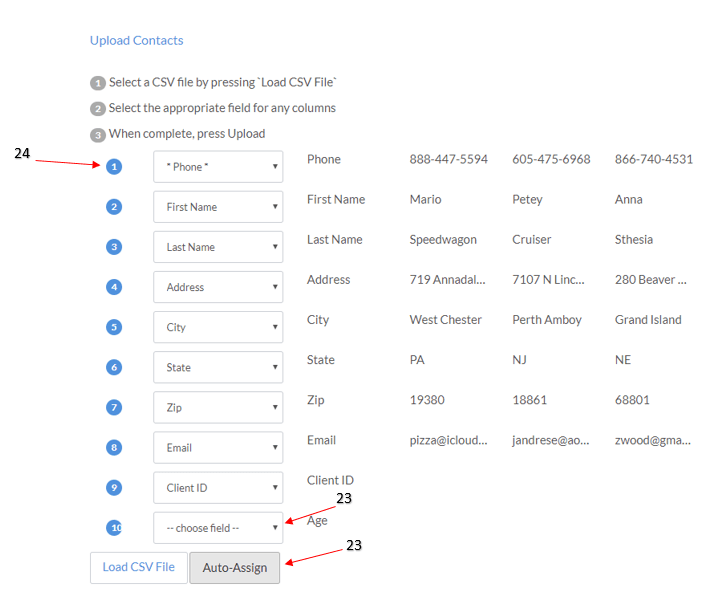
25. Randomize takes the .csv file and mixes the order up so it will not be in the same order each time. (See Picture Below for 25-30)
26. Prevent Duplicate Phone Numbers Against All Previous Contacts - will look at the .csv file and make sure there are no duplicate numbers on the dialer anywhere. (All campaigns and scheduled call backs) Not typically use by collection companies.
27. Don’t upload Any Phone Numbers that are already in this Campaign -will check the campaign you are trying to upload more contacts into and make sure one number is not being called more than one time.
28. Don’t upload Any Phone Numbers that are in Active Campaigns- If you have agents working a campaign at the time you are building this campaign and don’t want to load any of those numbers that they are calling right now then you would check this, so it doesn’t load the numbers actively being called.
29. Scrub Against Our Do-Not-Call List - We don’t provide a do not call list so leave it unchecked unless you wish to create your own. Feel free to add numbers you do not want to call to the do not call list. Once you put a number in the do not call list it CAN NOT be removed.
30. Click “I Am Allowed to Call These Contacts” and then click “Upload”.
31. Your campaign is ready to be dialed.
Tell your Agents to log on, give them the name of the Campaign you wish for them to work, Dial, and Smile.

